Unsigned code execution on LK bootloaders
Posted on Wed 06 December 2023 in writeup
In this article, I will explain how I successfully managed to gain code execution within the Little Kernel (LK) context of (unsecure) MediaTek devices.
As an important note, similar to what was discussed in my first article, this method is only applicable to devices that are capable of booting unsigned images.
I will also provide a detailed explanation of how amonet based exploits work, since they were the main inspiration for this project.
In any case, this is probably going to be a long article, so prepare yourself a cup of coffee and get comfortable :)
Background
Upon realizing the potential to modify bootloader images through byte-patching, allowing me to manipulate function returns at my will, I felt motivated to expand this idea.
My aim was to refine this method for more complicated tasks, like executing arbitrary code or dynamically patching memory. Creativity isn't my strongest suit, so I turned my attention to existing LK payloads, particularly amonet and its various forks:
- amonet: The original exploit, developed by xyzz and chaosmaster to unlock Amazon Fire tablets.
- kamakiri: A fork of amonet, which was updated to support newer Amazon Fire devices.
- lgk10exploit: A fork of amonet, which was updated and extended by arturkow2000 to support the LG K10 2017.
Understanding amonet
In my opinion, amonet is a remarkably clever piece of work, and I believe it merits a detailed explanation to fully grasp its workings before I dive into my own project. This exploit divides into 3 main components:
brom-payload: exploits a bootrom vulnerability, granting read/write access to the eMMC.lk-payload: operates within the LK context. Applies patches to functions and memory on runtime in order to unlock the bootloader and perform other tasks.microloader: bridge to the LK payload. Prepares the environment by clearing the cache and jumping to the LK payload.
Since the first stage of amonet is unrelated to LK, I won't be explaining it in this article. Instead, I will focus on the second and third stages, which are the ones that interest us the most.
microloader
microloader is a tiny but compact payload that is executed by the bootloader after a specially crafted, malicious boot image is flashed onto the device. This execution is possible because, during the image loading process, the bootloader overwrites its own data with the payload, leading to its execution.
This exploit takes advantage of a buffer overflow in mboot_android_load_bootimg. The function doesn't properly check if the size of what it's loading is too big, which lets the attacker overwrite the bootloader's data with their own payload.
int mboot_android_load_bootimg(char *part_name, unsigned long addr) {
    ...

    // Calculate the start address of the boot image
    start_addr =(u64)part->start_sect * BLK_SIZE + g_boot_hdr->page_size;
    ...

    // Check for the mkimg header in the boot image
    dev->read(dev, start_addr, (uchar*)addr, MKIMG_HEADER_SZ, part->part_id);
    ...

    // No validation is performed on g_bimg_sz. If the attacker manipulates
    // this value to be larger than the allocated space at addr, they will be
    // able to cause a buffer overflow, which, if controlled correctly, can be
    // used to divert the execution flow to the payload.
    len = dev->read(dev, start_addr, (uchar*)addr, g_bimg_sz);
    ...

    return len;
}
The script responsible for crafting this image is called inject_microloader.py. Within this script, there are specific offsets for pieces of code known as gadgets. These gadgets, or sequences of instructions, are repurposed by the exploit, in what is known as a Return-oriented programming (ROP) chain, to achieve code execution.
Additionally, it also contains important memory addresses, like the base address of the LK and the precise location where the microloader gets injected to (see base and inject_addr or shellcode_addr respectively).
chain = [
    pop_r0_r1_r2_r3_r4_r6_r7_r8_ip_lr_pc,
    shellcode_addr,               # r0
    shellcode_sz,                 # r1
    0xDEAD,                       # r2
    cache_func,                   # r3
    0xDEAD,                       # r4
    0xDEAD,                       # r6
    0xDEAD,                       # r7
    0xDEAD,                       # r8
    0xDEAD,                       # ip
    0xDEAD,                       # lr
    blx_r3_pop_r3,                # pc
    0xDEAD,                       # r3
    shellcode_addr                # pc
]
chain_bin = b"".join([struct.pack("<I", word) for word in chain])
Imagine the ROP chain as a series of steps in a staircase, where each step is a gadget or a value that takes the processor closer to executing the payload. The chain is set up carefully so that each part leads to the next one, finally ending in the microloader being executed.
- pop instruction: the
popinstruction is used to remove values from the stack and load them into registers. The variant used in our case, removes 10 values from the stack and loads them into a sequence of registers. - shellcode size and address: they represent the size and memory location of the microloader, respectively. The size gets loaded into register
r1, while the address gets loaded into registerr0. 0xDEAD: this value is used as a placeholder for registers that are not used by the exploit. It's mainly necessary to keep the stack aligned, as thepopinstruction removes 10 values from it.- cache function: represents the address of the
arch_clean_invalidate_cache_rangefunction, which takes two arguments: the address of the memory to be flushed and its size. It loads these from the previously mentioned registersr0andr1, respectively. - blx and pop instructions: the
blxinstruction is used to branch with link and exchange the instruction set. In simpler terms, it calls a subroutine located at the address inr3, which in our case is the cache function. The second part of this instruction is responsible for setting up the next value that will be loaded intor3after the subroutine finishes executing. This value is loaded from the stack, which is why thepopinstruction is used. - shellcode address: we set the Program Counter (PC) to the address of the payload, so the CPU executes it after returning from the cache function.
The main code of the microloader is located in the main.c file and performs 3 actions to jump to the LK payload. The first thing it does is to read the LK payload from the boot0 (also known as preloader) partition.
size_t ret = dev->read(dev, PAYLOAD_SRC, dst, PAYLOAD_SIZE, BOOT0_PART);
Afterwards, it clears the cache once again, this time to ensure that the LK payload is loaded into memory.
cache_clean(dst, PAYLOAD_SIZE);
Finally, it jumps to the LK payload, which is located at the address 0x81000000.
void (*jump)(void) = (void*)dst;
jump();
lk-payload
The LK payload is the last and most complex part of the exploit. As we saw before, it's loaded into memory by the microloader and executed immediately after. This payload has the control over the LK context, which means that it can perform a wide variety of tasks, from memory patching to running arbitrary code.
The first action of the payload is to locate the starting addresses of key partitions by analyzing the GPT. This task is accomplished by the parse_gpt function. Identifying these starting points is crucial because the payload will need to access and interact with the data on these specific partitions later on.
static void parse_gpt() {
    uint8_t raw[0x800] = { 0 };
    struct device_t *dev = get_device();
    dev->read(dev, 0x400, raw, sizeof(raw), USER_PART);
    for (int i = 0; i < sizeof(raw) / 0x80; ++i) {
        uint8_t *ptr = &raw[i * 0x80];
        uint8_t *name = ptr + 0x38;
        uint32_t start;
        memcpy(&start, ptr + 0x20, 4);
        if (memcmp(name, "b\x00o\x00o\x00t\x00\x00\x00", 10) == 0) {
            printf("found boot at 0x%08X\n", start);
            g_boot = start;
        } else if (memcmp(name, "r\x00\x65\x00\x63\x00o\x00v\x00\x65\x00r\x00y\x00\x00\x00", 18) == 0) {
            printf("found recovery at 0x%08X\n", start);
            g_recovery = start;
        } else if (memcmp(name, "U\x00\x42\x00O\x00O\x00T\x00\x00\x00", 12) == 0) {
            printf("found lk at 0x%08X\n", start);
            g_lk = start;
        } else if (memcmp(name, "M\x00I\x00S\x00\x43\x00\x00\x00", 10) == 0) {
            printf("found misc at 0x%08X\n", start);
            g_misc = start;
        }
    }
}
The next step it takes is to restore the overwritten data of the bootloader. As far as I know, this is done as a safety measure, to prevent unexpected behaviors from occurring.
unsigned char overwritten[] = {
    0x71, 0x12, 0xE0, 0x81, 0x39, 0x14, 0xE0, 0x81, 0x49, 0x10, 0xE0, 0x81, 0xC1, 0x12, 0xE0, 0x81,
    0x35, 0x14, 0xE0, 0x81, 0x00, 0x84, 0xE6, 0x81, 0x65, 0x11, 0xE0, 0x81, 0xE5, 0x11, 0xE0, 0x81,
};
memcpy((void*)0x81E6C000, overwritten, sizeof(overwritten));
Following this, it reads the bootloader message from the MISC (called para on newer devices) partition and performs different actions based on its contents:
boot-amonet: forces the device to boot into (hacked) fastboot mode by setting the boot mode to99.FASTBOOT_PLEASE: does the same with the exception that it's permanent until a recovery boot is performed.
...
uint8_t bootloader_msg[0x10] = { 0 };
dev->read(dev, g_misc * 0x200, bootloader_msg, 0x10, USER_PART);
if (strncmp(bootloader_msg, "boot-amonet", 11) == 0) {
    fastboot = 1;
    memset(bootloader_msg, 0, 0x10);
    dev-write(dev, bootloader_msg, g_misc * 0x200, 0x10, USER_PART);
} else if (strncmp(bootloader_msg, "FASTBOOT_PLEASE", 15) == 0) {
    if (*g_boot_mode == 2) {
        memset(bootloader_msg, 0, 0x10);
        dev->write(dev, bootloader_msg, g_misc * 0x200, 0x10, USER_PART);
    } else {
        fastboot = 1;
    }
}
...
After verifying what boot mode to use, the payload proceeds to apply a set of patches to LK functions and memory, similar to what my lkpatcher does but on runtime.
The first patch is applied to the signed_codeamzn_target_is_unlocked function, which is responsible for checking if the device is unlocked. If the device is unlocked, it returns 1, otherwise it returns 0.
int signed_codeamzn_target_is_unlocked(void)
{
    char signed_code [256];
    memset(signed_code,0,0x100);

    if (!idme_get_var_external("unlock_code", signed_code,
                               sizeof(signed_code)) &&
            (!(amzn_verify_unlock(signed_code,
                    sizeof(signed_code))))) {
            return 1;
    } else {
            return 0;
    }
}
In this case, the patches are represented in hex values which are equivalent to the following instructions:
0x2001: translates tomovs r0, #1, which sets the value of registerr0to1.0x4770: translates tobx lr, which returns from the function.
patch = (void*)0x81E20B40;
*patch++ = 0x2001;
*patch = 0x4770;
The second patch is applied to the amzn_verify_limited_unlock function, which verifies the device's unlock code by decrypting and checking an RSA signature. If the signature is valid, the device can be unlocked; if not, the process fails.
This is called by amzn_verify_unlock but it's patched directly because there's another part of LK that enables root shell depending on its return value (i.e: it calls the function directly instead of amzn_verify_unlock).
iVar2 = idme_get_var_external("unlock_code", signed_code,0x100);
if ((iVar2 == 0) && (iVar2 = amzn_verify_unlock(signed_code, 0x100), iVar2 == 0)) {
    sprintf("console=tty0 console=ttyMT3,921600n1 root=/dev/ram",
            "%s androidboot.unlocked_kernel=true",
            "console=tty0 console=ttyMT3,921600n1 root=/dev/ram");
}
Similar to the previous patch, this one is also represented in hex values, which are equivalent to the following instructions:
0x2000: translates tomovs r0, #0, which sets the value of registerr0to0.0x4770: translates tobx lr, which returns from the function.
patch = (void*)0x81e20a1c;
*patch++ = 0x2001;
*patch = 0x4770;
The third patch forcefully enables UART by setting the two printk.disable_uart=1 constants to 0. This is accomplished by using strcpy over the memory location where the constants are stored.
strcpy((char*)0x81e55f28, "printk.disable_uart=0");
strcpy((char*)0x81e55e10, " printk.disable_uart=0");
The last patch is only used when the device isn't booting to fastboot mode. It changes the device's normal read function, given by get_device(), to a customized hook.
These new functions are needed so the bootloader can read the malicious boot images made by the exploit correctly.
patch32 = (void*)0x81e6200c;
*patch32 = (uint32_t)read_func;
patch32 = (void*)&dev->read;
*patch32 = (uint32_t)read_func;
Once all the patches are applied, the payload clears the cache and jumps to the original LK code, specifically to the app function, which can be considered as the main function or the entry point of LK.
cache_clean(lk_dst, LK_SIZE);
int (*app)() = (void*)0x81e3cb31;
app();
Conclusion
As we've seen, amonet is a smart exploit that makes use of weaknesses in both bootrom and LK to unlock devices unofficially.
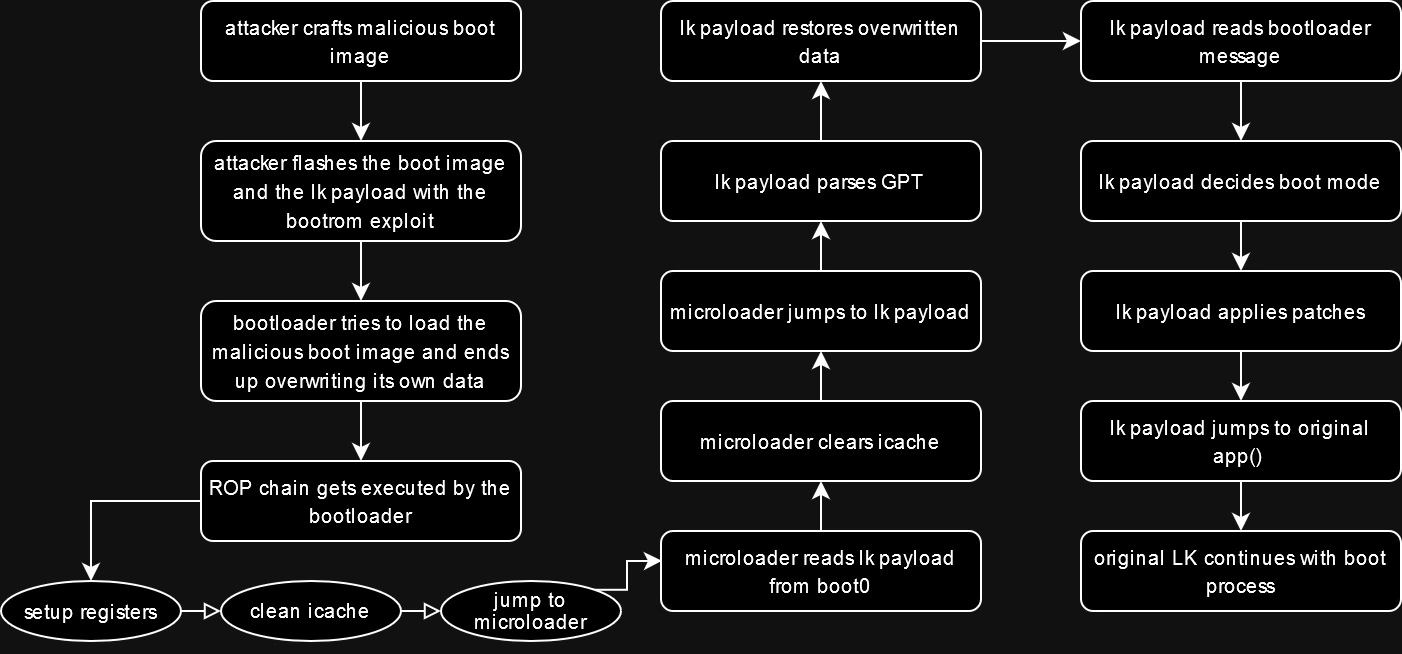
As a final summary, I've tried to put together a diagram. Please remember that I'm not a professional in this area, so the diagram might not be perfect.
My approach
Having explored amonet, I chose to replicate its LK payload functionality. My focus on unsecure devices allowed me to forget about microloader and the whole ROP chain logic, which made the task considerably easier... or so I thought.
In this case, I decided to use my old MT8163 tablet, which was manufactured by the now-defunct company BQ, for this experiment. My first step involved downloading the stock firmware and extracting the bootloader image.

Checking whether the device can boot unsigned images
The initial step I took was to verify if the device could boot unsigned bootloader images. To accomplish this, I swapped out the standard => FASTBOOT mode... message, which appears when the device boots into fastboot mode, with a modified version.
r0rt1z2@r0rt1z2$ md5sum lk-sign.bin && strings lk-sign.bin | grep FASTBOOT
104c7d23e4f8df97d78358256b3fdbd4  lk-sign.bin
=> FASTBOOT mode...
r0rt1z2@r0rt1z2$ sed -i 's|=> FASTBOOT mode...|=> SLOWTBOOT mode...|g' lk-sign.bin
r0rt1z2@r0rt1z2$ md5sum lk-sign.bin && strings lk-sign.bin | grep SLOWBOOT
aa386a7188074909a5dd4e8cdf8fc16e  lk-sign.bin
=> SLOWBOOT mode...
r0rt1z2@r0rt1z2$
As observed, the hash of the image changed, subsequently invalidating its signature. Following this, I flashed the modified image onto the device and crossed my fingers.
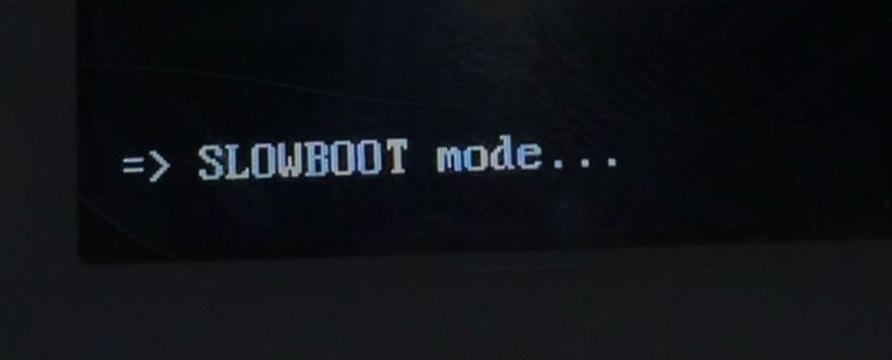
Success! The device booted into fastboot mode, and I was greeted with the modified message. This meant that I could now proceed to the next step :)
Building a basic payload
Knowing that the device is capable of booting unsigned images, I then shifted my focus to building a payload. I began with a basic one, designed to simply display the classic Hello World! message on the screen. Ideal circumstances would have involved having UART access to the device, but due to a lack of the necessary hardware, this wasn't an option for me.
I opted to use the built-in video_printf function, which lets you print text to the screen instead. This approach made debugging considerably more challenging, but it was the only viable alternative available to me.
Following the approach explained in my previous article, I loaded the image into Ghidra and began searching for that function. I did this by looking for the string FASTBOOT mode..., the text I had modified earlier. This method eventually led me to the video_printf function, which I found located at the address 0x41e20c0c.

After locating the function, I crafted a simple payload designed to invoke it and display the previously mentioned message. This payload was compiled using the arm-eabi-gcc toolchain, resulting in the creation of a binary file named payload.bin.
size_t (*video_printf)
       (const char *format, ...) = (void *)(0x41e20c0c | 1);
__attribute__((section(".text.main"))) int main(void) {
    video_printf("Hello world from LK!\n");
}
Injecting the payload
With the payload ready, I had to figure how and where to inject it. Theoretically, I could just append it to the end of the bootloader image, so I decided to try that first.
In my scenario, the LK I'm working with ends at 0x41E431EC (0x41E00000 + 0x431EC). Since machines require code to be located at aligned memory addresses for execution, I opted to use 0x41E43200 as the injection point for my payload.
r0rt1z2@r0rt1z2$ hexdump -C lk-sign.bin | tail
000431c0  00 00 00 00 00 00 00 00  00 28 00 00 00 00 00 00  |.........(......|
000431d0  06 03 e6 84 1a c0 7e 27  56 0c 42 8b ac a0 e8 8b  |......~'V.B.....|
000431e0  1e 10 82 eb 45 45 45 45  ff ff ff ff              |....EEEE....|
000431ec
r0rt1z2@r0rt1z2$ (dd if=/dev/zero bs=1 count=20 2>/dev/null; cat payload.bin) >> lk-sign.bin
r0rt1z2@r0rt1z2$ hexdump -C lk-sign.bin | tail
000431e0  1e 10 82 eb 45 45 45 45  ff ff ff ff 00 00 00 00  |....EEEE........|
000431f0  00 00 00 00 00 00 00 00  00 00 00 00 00 00 00 00  |................|
00043200  08 b5 04 4b 04 48 7b 44  1b 68 78 44 98 47 00 20  |...K.H{D.hxD.G. |
00043210  08 bd 00 bf 2a 00 00 00  0e 00 00 00 48 65 6c 6c  |....*.......Hell|
00043220  6f 20 77 6f 72 6c 64 20  66 72 6f 6d 20 4c 4b 21  |o world from LK!|
00043230  0a 00 00 00 0d 0c e2 41                           |.......A|
00043238
r0rt1z2@r0rt1z2$
Once the payload was injected, I manually replaced the original call to app() with a call to 0x00043200, I flashed the modified image onto the device and tried to boot. Unfortunately, it didn't work. I stumbled upon a bootloop. Something was wrong, but I couldn't figure out what it was because I had no way to debug the device.
It looked like I hit a dead end, but I didn't want to give up just yet. After reading arturkow2000's XDA thread, I noticed that he mentioned LK having a built-in function that shows the stacktrace and dumps the registers when a crash occurs. I checked several BSP leaks until I found a function called dump_fault_frame, which looked really promising.
static void dump_fault_frame(struct arm_fault_frame *frame)
{
    dprintf(CRITICAL, "r0  0x%08x r1  0x%08x r2  0x%08x r3  0x%08x\n", frame->r[0], frame->r[1], frame->r[2], frame->r[3]);
    dprintf(CRITICAL, "r4  0x%08x r5  0x%08x r6  0x%08x r7  0x%08x\n", frame->r[4], frame->r[5], frame->r[6], frame->r[7]);
    dprintf(CRITICAL, "r8  0x%08x r9  0x%08x r10 0x%08x r11 0x%08x\n", frame->r[8], frame->r[9], frame->r[10], frame->r[11]);
    dprintf(CRITICAL, "r12 0x%08x usp 0x%08x ulr 0x%08x pc  0x%08x\n", frame->r[12], frame->usp, frame->ulr, frame->pc);
    dprintf(CRITICAL, "spsr 0x%08x\n", frame->spsr);

    ...

    dprintf(CRITICAL, "%c%s r13 0x%08x r14 0x%08x\n", ((frame->spsr & MODE_MASK) == MODE_FIQ) ? '*' : ' ', "fiq", regs.fiq_r13, regs.fiq_r14);
    dprintf(CRITICAL, "%c%s r13 0x%08x r14 0x%08x\n", ((frame->spsr & MODE_MASK) == MODE_IRQ) ? '*' : ' ', "irq", regs.irq_r13, regs.irq_r14);
    dprintf(CRITICAL, "%c%s r13 0x%08x r14 0x%08x\n", ((frame->spsr & MODE_MASK) == MODE_SVC) ? '*' : ' ', "svc", regs.svc_r13, regs.svc_r14);
    dprintf(CRITICAL, "%c%s r13 0x%08x r14 0x%08x\n", ((frame->spsr & MODE_MASK) == MODE_UND) ? '*' : ' ', "und", regs.und_r13, regs.und_r14);
    dprintf(CRITICAL, "%c%s r13 0x%08x r14 0x%08x\n", ((frame->spsr & MODE_MASK) == MODE_SYS) ? '*' : ' ', "sys", regs.sys_r13, regs.sys_r14);

    ...

    if (stack != 0) {
        dprintf(CRITICAL, "bottom of stack at 0x%08x:\n", (unsigned int)stack);
        hexdump((void *)stack, 128);
    }
}
As expected, the function displayed everything in UART via the dprintf function so for me, it was impossible to see the stacktrace and the register dump.
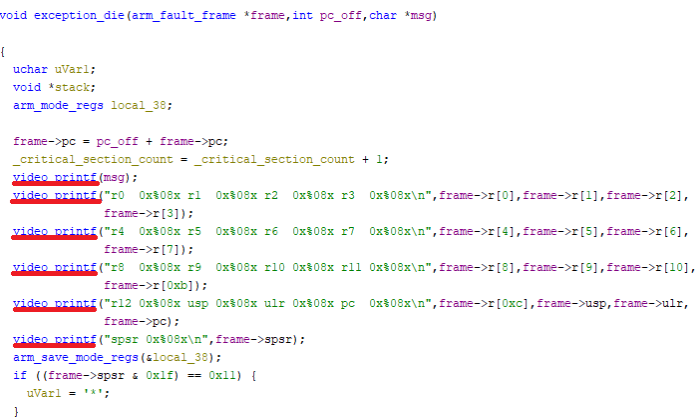
Fortunately, both functions have identical signatures, so I decided to swap all the calls to video_printf. By doing this, I should be able to see the output directly on the screen, allowing me to track the process visually.
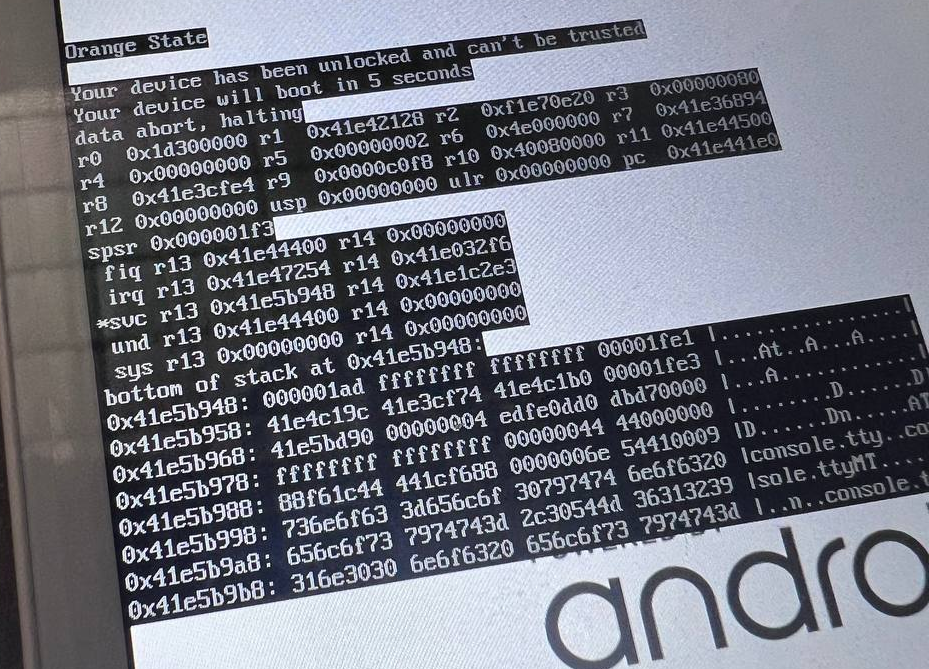
Once patched, I flashed the modified image onto the device and tried to boot again. This time, I was greeted with a stacktrace and a register dump. It looked like the device was crashing when it tried to execute the payload. The error message was data abort, halting, which, as per the ARM official documentation, means that the processor tried to access an illegal or invalid memory address.
After many hours spent in thought and debugging, I finally figured out the issue. The bootloader stack, ending at 0x41e585cc, was overwriting my payload.
Right at the start of the bootloader, there's a function with a loop that appears to zero out the entire stack. It does this by initializing each pointer to 0x0. This code seems to be part of crt0.S, which then calls kmain, the main function of LK.
void crt0(void)
{
  for (int i = 0; i < 0x41e585cc; i += 1) {
    *i = 0;
  }
  kmain();
  do {} while( true );
}
To ensure my payload was positioned beyond the stack's boundary, I opted for 0x41e585d0 as the injection address. However, even after injecting the payload and flashing the modified image, I encountered the same crash.
At this point, I was really confused. What am I doing wrong? Then it hit me. The bootloader itself has a header, which is used to define certain parameters, like the size of the image. This header is used by the preloader (the previous boot stage) to load the LK image to the RAM. Could it be that adjusting this header to load the entire image might be the key?
=====================================
| Partition Name : lk
| Data Size      : 271384
| Addressing Mode: -1
| Address        : 0x41e00000
| Header Size    : 512
| Header Version : 1
| Image Type     : 0x0
| Image List End : 0
| Alignment      : 16
| Data Size      : 0
| Memory Address : 0x0
=====================================
I checked my scatter file and noticed the LK size was set to 0x60000, which is roughly 4MB. I then updated the header to match this size, flashed the updated image onto the device, and hoped for the best.
¡Funciona, it works! I was finally able to display the Hello World! message on the screen.
Adding more functionality
After getting the basic payload working, I began enhancing it with additional features. The first step was to create a function to patch LK memory, which I named patch_lk. This was done to modify certain functions, so they consistently return specific values, using the same method found in amonet's LK payload.
void patch_lk() {
    // Disable orange state warning
    volatile uint16_t *x = (volatile uint16_t *)0x41e03a48;
    x[0] = 0x2000;
    x[1] = 0x4770;

    // Disable red state warning
    x = (volatile uint16_t *)0x41e039ec;
    x[0] = 0x2000;
    x[1] = 0x4770;

    // Force enable FRP unlock
    x = (volatile uint16_t *)0x41e1f86c;
    x[0] = 0x2001;
    x[1] = 0x6008;
    x[2] = 0x2000;
    x[3] = 0x4770;

    // Force green state
    ((volatile uint32_t *)0x41e44518)[0] = BOOTSTATE_GREEN;

    // Force enable UART
    *((volatile uint8_t *)(0x41e370cc + 20)) = '0';
    *((volatile uint8_t *)(0x41e367a4 + 21)) = '0';

    // Disable low battery check
    x = (volatile uint16_t *)0x41e1ed84;
    x[0] = 0x2001;
    x[1] = 0x4770;
}
I also implemented a custom fastboot command called fastboot oem hexdump. This command allows you to dump the contents of a specified memory address onto the screen in a hexdump format.
void cmd_hexdump(const char *arg, void *data, unsigned sz) {
    char *args = strdup(arg);
    char *a = strtok(args, " ");
    char *s = strtok(NULL, " ");

    if (a != NULL && s != NULL) {
        long al = strtol(a, NULL, 0);
        long sl = strtol(s, NULL, 0);
        hexdump((void *)al, sl);
    } else {
        video_printf("Invalid arguments\n");
    }

    fastboot_okay("");
}
The command can be invoked by running fastboot oem hexdump <address> <size>. For example, fastboot oem hexdump 0x41e00000 0x100 will dump the first 256 bytes of the LK image.
r0rt1z2@r0rt1z2$ fastboot oem hexdump 0x41e00000 0x100
OKAY [  1.117s]
Finished. Total time: 1.118s
r0rt1z2@r0rt1z2$
Despite not considering myself highly creative, I've shared all the enhancements I've made to the payload so far. For those interested, I've uploaded the source code to GitHub. Feel free to explore it, adapt it to your own device, and perhaps even integrate features of your own.
Porting the payload to other devices
As expected, the payload isn't designed to work immediately on different devices. Nonetheless, I've made an effort to keep it as universal as possible, simplifying the process of modifying it to work on other devices.
The initial and most important step involves identifying the right location to inject the payload. This can be achieved by loading the LK image into Ghidra and examining the first function, commonly referred to as crt0. In this function, as previously mentioned, there's a loop dedicated to initializing the stack. The final address within this loop marks the end of the stack.
Following that, it's just a matter of locating an aligned address. My usual approach is to add 0x7C to the end of the stack. Therefore, in this situation, the injection point would be 0x41E5FE50 (0x41e5fdd4 + 0x7C).
After pinpointing the injection point, the next step is to locate where the payload will be called from, ideally replacing the original call to the app() function. A straightforward method to find app() is by searching for the specific string <ASSERT> %s:line %d\n","app/mt_boot/mt_boot.c" in Ghidra, as this assert is located within app().
Once you find it, you can then identify the reference to it, which is typically a blx call. We can use this to call our own payload instead. In my case, the call to app() is located at 0x41e19284.
Lastly, the only remaining task is to locate the addresses of functions you intend to utilize in the payload, like video_printf, fastboot_register, and others. To avoid lengthening the article, I won't delve into details here. Refer to the previous sections for guidance on how to accomplish this. In any case, remember to align these addresses with |1.
...
int (*app)() = (void *)(0x41e1ccc8 | 1);

size_t (*dprintf)(const char *format, ...) = (void *)(0x41e20e70 | 1);
size_t (*video_printf)(const char *format, ...) = (void *)(0x41e20c0c | 1);

struct device_t *(*get_device)() = (void *)(0x41e14050 | 1);
...
Once you've done that, build the payload and inject it with inject_payload.py by using the proper arguments (see -h for help).
Conclusion
Despite many devices being heavily secured, there are still a few vulnerabilities that, if exploited correctly, can lead to unlocking the bootloader and much more.
For unsecured devices, achieving full code execution on LK is possible via a tailored payload injected at a specific point. This opens up numerous possibilities, including making debugging of custom kernels easier, implementing custom fastboot commands, and even modifying LK functions and memory at runtime for various purposes.
